We go researching the internet, we spend dozens of minutes, even hours, looking at and looking at models of pinball machines with 5 balls, with 6 balls or with 7 balls, with finishes of our favorite anime characters but after beating ourselves up, we realize something terrible:
Most of them, the considered genuine pinball machines, are inaccessible, in terms of price, for many of the users who visit us daily. And of course, who does not say that he wants a real pinball machine and not an “f” for an imitation pinball device and that it is useless? Almost no one, to say none
That is why we have given you the definitive solution to this problem: for a small cost, if you do not have some of the materials that we will now tell you and with a clear, direct and to the point explanation through didactic text and a YouTube video. taken from the famous channel “I tell you how to do it “ , you will learn to build an original and compact domestic pinball machine from scratch
It does not matter if you have always been bad at crafts. This time you will hit the key, you will see that it is. Enjoy our tutorial dear pinballero/a!
Materials you need to make your homemade pinball machine
The vast majority of these elements can be obtained in many physical stores in your residence or in the comfort of this page of mypinballmachine.club, for a small price. These are:
- Cardboard
- A small blade to cut folios
- Wooden chopsticks or chopsticks instead
- Canic
- DIN-A4 sheets
- Awl
- Nut washers
- Pen
- Cardstock of various colors
- Glue gun
- Elastic band
- Strong glue
- Elastic rubber
- Thread
- Wire
- Pliers
The video starts at 3:00, which is when it starts. The first thing you have to do is have the video, of course. Here it is:
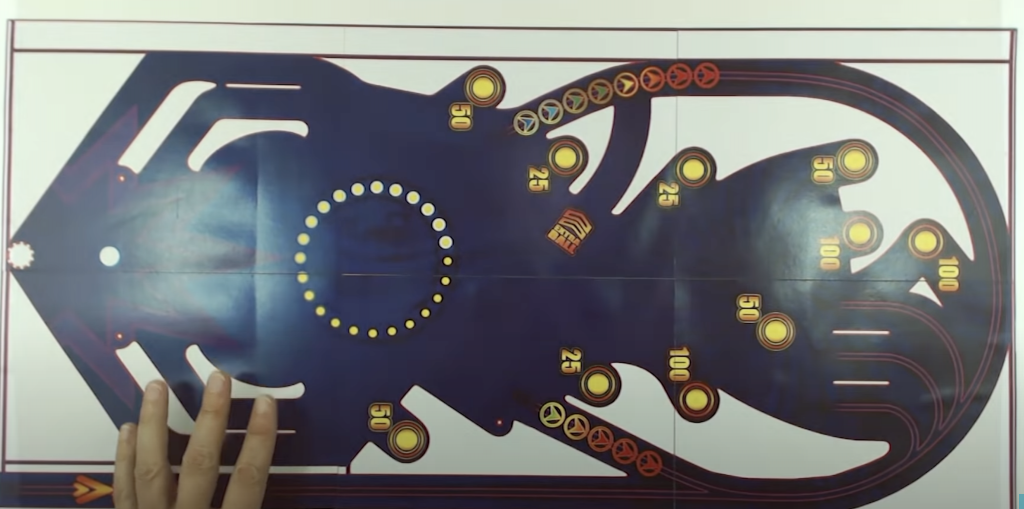
The second thing is to have each of the fragments of the template printed on several DIN-A4 sheets, 6 specifically, so that later, once you paste everything together on the cardboard, it will be exactly as seen at minute 3:21, which He has done the same thing we just told you.
The next thing you will have to do is count the dots in yellow and the white dot below. Here is the template:
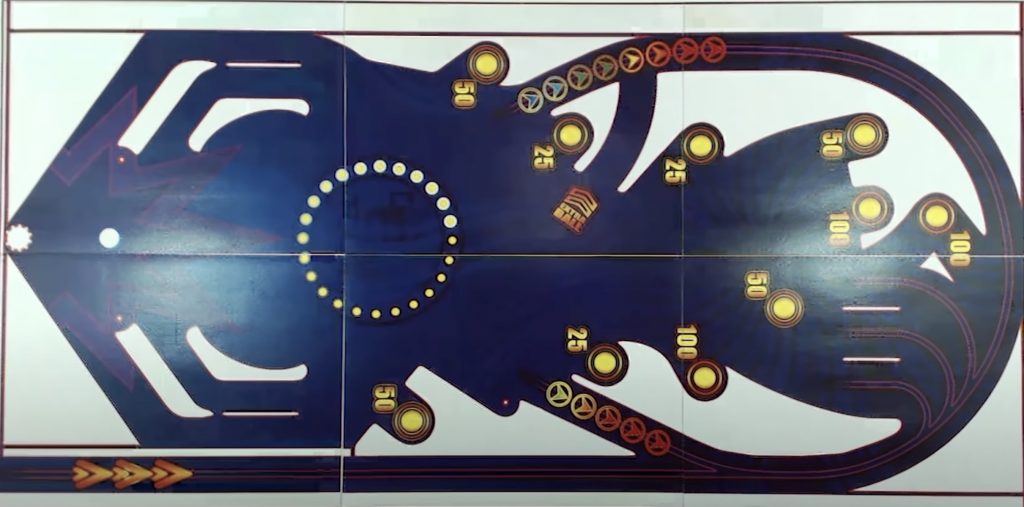
Each of them will determine your score and the target score so that we are going to tell you, it is what nobody wants to happen to him… To do this, you will use the blade that is reflected at minute 3:27. Important: Try to cut each of the points of the points slightly larger than the marble so that it penetrates through it without any problem
The next thing to elaborate are the well-known “flipers”, flanks or side raised to a measured height, the walls through which the pinball ball collides until it reaches the levers, located just below the whole. To do this, you will use normal wooden sticks or Chinese sticks of approximately 5mm in diameter, and with the help of an awl, make the mark or sign where you will insert the stick, as you can see at minute 3:58
Where you have to make the mark is indicated in two points below, next to where we will place our homemade pinball levers. Make sure you make the slit big enough for the stick to fit in without any problem. At 4:16, you can see how he uses nut rings, the same size as the toothpicks. What you have to do with them, first, is to stick them in the two indentations that you just made
Consequently, take the template glued to the cardboard and paste it on another cardboard with the same length, width and the same thickness, as you can see at minute 4:32 . Make sure they are even and similar to how they did in minute 4:38, mark with the help of a pen the two holes of the washers on the cardboard that you just left just below the one you already had
When we have made the slits in the cardboard that is exempt from the template, we glue the rings as we did previously. You can see this step in detail from minute 4:52. Placing the video right at 5 minutes, it is the turn to build the partitions of the homemade pinball machine. You don’t want the ball to go to hell, right?
Well, pay attention to what we will tell you: to make the walls, cut 2cm cardboard strips and put them in both the length and the width of the template. The thing is that everything is airtight and safe so that the ball is located at all times inside the home pinball machine
Being horizontal, like the traditional electronic pinball machine, the right and left sides are longer, therefore, you will have to join several strips until everything is covered . The same with the thickness, as detailed from minute 5:25 . We must strictly follow what the template tells us, without further ado
In short, you have to look like the minute 5:50 . Got the idea right? The next thing is to glue each of the internal pieces of the board of the homemade pinball machine, that is, each of the mini-partitions present where the marbles will circulate. Here is the template:

If you look closely, each of these colored pieces of cardboard is shaped like the blank spaces on the template. This is where each of the pieces will overflow. You will proceed to cut them ( minute 6:12 ). You can help yourself with the template to shape each of these fragments: Help yourself to a piece of paper and then, placing it on the cardboard, cut them out with the knife and the help of a ruler so that everything comes out more precise
Make sure the pieces are about 1cm thick size. To line each of the pieces, use the cardboard the same size (width) as the marbles. To stick them, use the silicone gun, preferably, so that it does not come off with the impact of the marbles, as you can see at minute 6:50
It has to be as reflected in the minute 7:06 . To fill in the remaining hollowed part that remains from the lining, you can use several cardboard dice that are at the same height as the lining. In all of them, introduce silicone glue and stick them right in the blank spaces that we told you before. We put the template again so that you know how the shape of each of the templates has to be:
At minute 7:40 you can see how the pieces at the top look, so you can see how it looks and get an idea. It is at minute 7:50 where everything is already seen as ways, as we hope that yours is remaining
Ok, so far so good. The next thing you have to do is glue the 4 slightly elongated pieces. The width has to be equal to that of the marbles and the length as it is in the template. We do the same procedure of lining them again to be something showy and not simple
On the edges you have to glue other cardboard strips, the same size as the thickness of the cardboard, so that everything is well dressed. From minute 8:15 you can see this process in detail. 10 seconds later, you can see how everything looks to get an idea of how it should look
Always make sure before gluing it, that the ball penetrates without problems on both sides of the gaps resulting from coupling the different partitions. To make the levers, which is the following that comes in the video, help yourself with the template, which you have right here below:
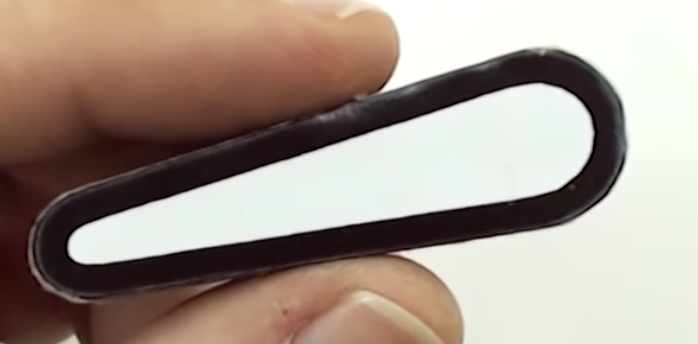
The procedure to follow here is the same as we have done so far: The size of the flippers must be the same width as the marbles. Consequently, we lined them with cardboard so that everything is elegant and no cardboard is perceived anywhere. The next thing, will be to stick a washer in the most spaced fragment of the flipper, just as you can see at minute 8:55
Make a slit right in the opening of the washer until you see that the Chinese stick goes in correctly. Right after, stick the stick to the pin, make it very straight. Make sure it is straight. As an extra, you can add an elastic band to mitigate the impact of the marble on the levers, as reflected from minute 9:10
Make sure that the cut of the elastic strip and the glue you use to attach it to the cardboard, is on the back. Starting at minute 10, we see how he introduces two of the three flippers at the bottom. If you see that they do not fit perfectly to the shape of the partition in that specific area, you can file it with the help of a small sander
Placing the video at minute 10:40, you can see in detail what we just told you. The idea we want you to adopt is that the levers have to move up and down dynamically and not with locks . Once all this is done, we grab the piece of cardboard where we attach another 3 washers and make a horizontal and vertical line, starting from each of these washers
Then, at 5mm from the horizontal and 3mm from the vertical, you draw another two lines with the help of the pen. Right in the upper corners of this smaller square, as seen at 11:28, attach a 2cm-long piece of stick . To continue with the procedure that will be able to move the levers, put them in their natural position, that is, fully inclined until they collide with the partitions
You can easily fix it as it looks from minute 11:40 . Right on the side stick, at 12:00 minute, place another washer but with the nuance that you don’t have to stick it on the cardboard. We cut another stick in half, the kind that health professionals use to see if we have a swollen throat, and we place them above the two washers, as you can see at minute 12:10
We stick it, only, on the pinned pole of the flipper together with the washer. You also have to grab another stick from the side and lay it down just like it looks at 12:23 . We remove the washer and you will see that the lever is at the height of the thickness of the ring, which was what we wanted. Okay, now cut out a 1cm piece of Chinese stick and stick it right where it is at 12:44
You glue them right in the two upper corners, as we did previously with the small rectangular strips of wood. This will serve as a guide for the promoter of the flippers. We glue another two small pieces, having the round stick attached, as seen at minute 12:58 , and two other strips of the same size just above to ensure that it will not move from the site
Next, take two small pieces of cardboard and glue them together. Then, we glue them to the side of the washer anchored to the cardboard just at a 60 degree angle. Thus, the flippers will have a preset maximum aperture and no more. Also, stick a piece of Chinese stick right in the excess part of the small lever, as seen at minute 13:28, which protrudes a little, because we are going to introduce an elastic band
With this detail, you will get the lever to return to its natural position, which is to be tilted. To hold the elastic band, we will use a wire hook as we see at minute 13:45 . You hook it on the round piece fixed on the lever and on the hook. Next, you pull a little so that the rubber is somewhat taut and hit the hook right where it places it at minute 13:56
Just at minute 14:00, you will see in an easy, practical and comfortable way, how the button works with which you will spread the necessary force so that the ball goes up. Cool, huh? What you have to do now is keep the lever pressed in and make a mark right on the top that adjoins one of the pieces of cardboard (minute 14:05)
Next, provisionally remove the stick and cut it just 2cm from the mark to the left, that is, outwards, which is where we will use two circular covers so that pressing force on the lever will make it more enjoyable and comfortable for you. Look at yourself from minute 14:15, you will like it a lot, you will see
Right at the ends of the stick, knot a thread, not very thin, that is resistant, and take it to the bottom, doing the same procedure. Make sure the thread is taut and not curved. What is the idea here? That when you press the right key, the top flipper also moves and not just the bottom one. Do the same procedure at the other end. As you can see at minute 15:25, it does it just as we just told you
To give movement to the third flipper, put it in its natural position. Next, with the third sign made on the cardboard below, put the same lever that you put on the levers at the bottom and at the same height, with the help of the washer. Placing the video at minute 14:45, stick a piece of wooden stick of about 5cm, making sure that it is completely straight. Stick one exactly the same right on the pinball below
Less is left! Now, the next objective is to hermetically build the piece of cardboard where the mechanism that we have just made overflows, just as we did with the part of the cardboard where the template overflows. We cut 4 cardboard strips 4cm high and with the same width as the board . To one of them, we make a hole at the top, right in the center, and 2cm high and 5cm wide
You will paste all of them just as you can see at minute 16:02 . We will make a hole in the part of the adjoining cardboard with the buttons and you will paste it just as it is at minute 16:25 . Also cut two strips of cardboard 2cm wide and 18cm long . You will paste them just as seen in minute 16:36 . We do this in order that the marbles always go to the hole through which free passage leaves to the outside
From minute 17:00 , you will see that he begins to wind the wire with the help of a stick. It makes you look like a kind of dock. Then, with the help of pliers or pliers, cut two springs, leaving something like what is seen at minute 17:16 . Then, these rings can be inserted into the stick and pressing it with the pliers, you can fix them. If you see that it does not fix, stick it with silicone adhesive
Insert each of the rings into the buttons, as can be seen from minute 17:32 . The idea here is to ensure that the stick is fixed and cannot be removed from the mechanism at any time, ensuring a very sober and stable lever system. Voucher. Now stand at minute 18:00 . The objective here is to anchor the cardboard that we used at the beginning of the whole on the 3 corresponding wooden sticks
It has you look similar to how it looks at minute 18:16 . Next, glue this cardboard to the board and cut the excess piece of stick almost flush with the washers. Right after doing this, measure the white line that is just on the bottom right side of the template, that thin, long white line, and take the length to make another lined cardboard strip that is the same width as the marbles.
Glue this cardboard strip just as you can see at minute 18:48 . Do not forget to cover the entire structure. You have to have something like what is seen at minute 19:00 . Now, we are going with the marble booster, which will take us fully into facing a game in our homemade pinball device. Grabbing the sharp object again, we make an opening, just where it is located at 19:20, with the exact thickness of the round wooden stick
Then, we make an arch of wire slightly wider than the washers and glue it just as it is at minute 19:35 . Just at this minute you will see, in the lower part where we will press the balls forcefully, two small indentations. It will be here where we lighten our arc-shaped wire together with the metal ring . You have to make these slits at a distance, starting from the bottom where we made the hole, of about 2cm.
We introduce the stick, making sure that it enters through the metal ring that we have just anchored together with the wire perfectly, and is aligned with the red line on the template. We remove the stick little by little, so as not to move the position of the ring, and we stick it on the base of the cardboard with strong adhesive
And, of course, take another 2 pieces of cardboard that follow the slope of the delayed heights of both pieces that we glued on the upper and left edge respectively, and place it just as it is at minute 20:30 . Well, you will have already managed to give that slope shape to your homemade pinball machine as long as the ball goes, propelled by the force of gravity, downwards.
Flip the board over and grab a piece of cardboard 10cm high and the exact width of the board, and glue it right to the bottom edge, as you can see at minute 20:18 . Take another fragment but this time a little higher, about 16.5cm, and glue it right on the top edge. You can already imagine what we are going to do, right?
PD: Do not forget to add a ring in the pass where we will press force to our push button so as not to damage the cardboard and on the sides where we press force to move the lever. The buttons on the sides and on the bottom edge can be upholstered with cork wine stoppers cut in half, as you can see from minute 21:08
On the outer edge of the button, make a small horizontal slit to insert elastic bands and create the force mechanism with which you will propel the marble on the lower right side, just as seen at minute 21:33 . Next, make a small wire in a semi-square shape, with the same height as the cork and 1cm wider (minute 21:45)
Next, fold the legs starting from the middle inwards, leaving something like what you can see at minute 21:52 , and nail them right into the holes bordering the levers on the sides. From the minute we have told you, you can see in detail what we have just told you. You have to have something like what is seen at minute 22:00
With this, we will make a fixed hooking of a part of the band and this, accompanied by the narrow horizontal opening manufactured in the cork, we will be able to press the desired force. You will make like a kind of slingshot, to give you an idea. The next thing you will have to do is cut the handle stick 6cm from the cork
Insert it into the hole in the driving zone of the ball and cut the curved piece of a tongue depressor about 2cm high and glue it to the upper edge of the shooter, as you can see at minute 22:25 . Important nuance: the wire has to be anchored just parallel to the handle, not on one of the sides
As extra garnishes that will give a more refined touch to your homemade pinball device, you can stick species of soft elements that cushion the impact a bit, like a bicycle suspension, so that you understand us. From minute 22:56 you can see this process in detail . You can also do another as indicated at minute 23:11
As we want to give some versatility to our pinball machine and there are several balls in play, you will do the process that is explained from minute 23:55 . The fact of doing this, of putting the shock absorbers, will make you feel that you are in front of a real pinball machine
Now, cut two pieces of cardboard 1.3cm wide by 2.6cm long and make a line in the middle adjoining both ends, as seen at minute 24:20 . Divide in half with the help of a pen (half the entire length of the strip) and draw the lines one or two millimeters from the edge (the smallest). Proceed to cut them with a blade and then fold it, following the line right in the middle, as you do from minute 24:45
After making the slits, insert a fine wire and squeeze it inward to leave a loose space in the two pre-drilled holes. From minute 25:10 you can see this process in detail. Then paste it right where it is at minute 25:35
We almost have it done … Phew !! What a thrill 😱! To conclude with these details of leaving our family pinball machine well refined, cut a rectangular piece of cardboard 3cm wide by 6cm long, and another 2cm wide by 12cm long, joining them and leaving them as a kind of box or sofa, as seen from minute 25:55
You will stick this dressing right where the marbles will come out and, only, you will only need to add the marker to know who is the winner of the game, if you dare to play several with the work of art you are making. To do this, you will use the template, which you have right here:

To create the structure of the bookmark, grab two cardboard strips 14cm wide on the largest edge and 9cm on the smallest. The length has to be 43cm in total . At minute 26:32 you can see what we are telling you about. You have to have something like what is seen at minute 26:33. It doesn’t have to be exactly the same
It is just an idea so that you have a base where you can score the points of each player. To finish, glue transparent plastic strips on top of each of the 4 blank squares, as you can see from minute 27:05 . This in order to erase the scores for future games , as seen from minute 27:20
Glue the marker more or less to the middle of the largest edge of the table of the homemade pinball machine, as you can see from minute 27:35
Now, you have to … No, I’m kidding! We can only say one thing: ouh yeaaaaaaaaaaaaaaaaah, we are done !!! At first this craft looked like a difficult mountain to climb, but with patience and work, we can reach the top of the mountain. Show us that you have been by sending us a photo of how your homemade pinball machine was to our email [email protected]
We can only say that you did indeed achieve it, congratulations: you are one of that small group of people who achieve what they set out to do. Well, building a pinball machine does not require being someone from beyond or a member of NASA, but more than one surely decided to spend little money instead of making one with their own hands, as you did. Smell your eggs, sorry ! Hahahahaha 😜. Hey, in case you want to know where we are: Murcia